Tech Tip: Snapping in ArcMap
By Alissa Oder
Snapping is a key topic for all DAT/EM® Capture types, but the most questions come from Esri® ArcGIS users. Snapping is more complicated in ArcGIS, because there are different types of snaps that do or don’t work, potential for slow snapping, and potentially complicated settings. I hope this guide will help you understand snapping and make it work well for you.
Snap Ring Size
Snapping happens when the cursor is within the snap ring radius of the object to snap. To change the snap ring radius in DAT/EM Capture for ArcGIS (ArcMap):
- From the ArcMap window, Select DAT/EM Options from the DAT/EM Capture Tools or DAT/EM Capture Drawing Tools toolbar (they both start the same Options dialog):

- Select the "Snap" settings page.
- Set the "Snap tolerance" and click "Apply" or "OK" to activate it.
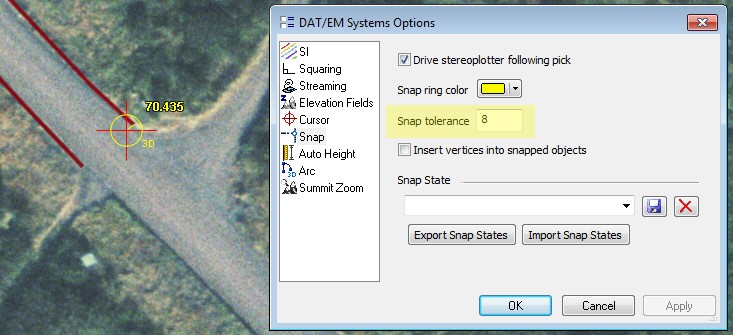 Snap Tolerance set to 8 ground units
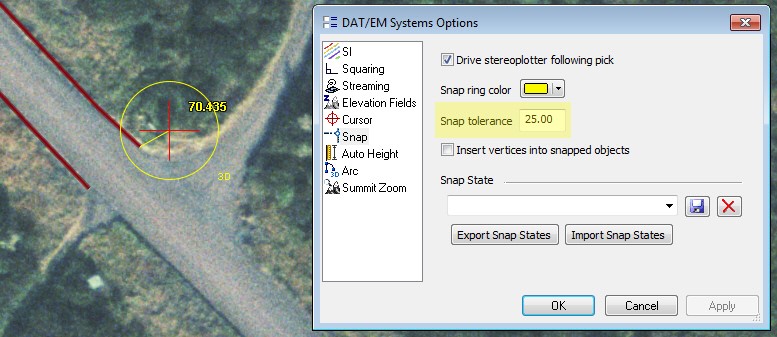 Snap Tolerance set to 25 ground units
The Snap tolerance is the same setting found in ArcMap's Editor toolbar>Snapping>Options>Snapping Tolerance; however, Superimposition will not refresh the snap ring size if you set it from there, because ArcMap does not publish the setting change where DAT/EM can detect that it has changed. It is best to set it from the DAT/EM Systems Options dialog shown above.
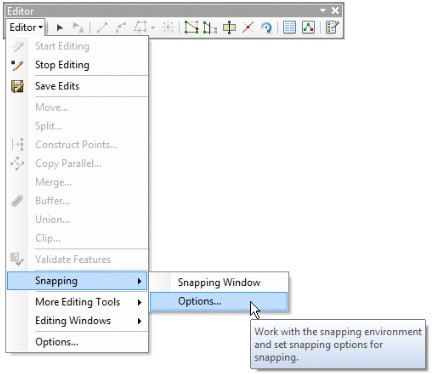
This method of setting the snap radius does not refresh SI until ArcMap exits and reopens
Classic Snapping Environment vs. the ArcMap Snapping Toolbar
Snapping in Capture for ArcGIS requires ArcMap's Classic Snapping Environment. DAT/EM can push an elevation value into this type of snapping to produce a 3D snap, and can turn off this type of snapping without unchecking all the checkboxes. Launch it quickly from the DAT/EM Capture Drawing Tools toolbar:

Quickly open the Classic Snapping Environment
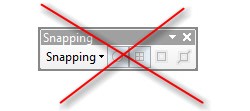
Do not use ArcMap's "Snapping" toolbar, because it does not work for both 2D and 3D. You will see very strange snapping behavior if you have this type of snapping on. Uncheck “Use Snapping” from the toolbar’s “Snapping” option, then pick “x” to turn off the Snapping toolbar. If it is not displayed, you will not be tempted to use it!
Do not use the ArcMap Snapping toolbar
Saving and Retrieving Classic Snapping Checkbox States
Do you find it tedious to check and uncheck the boxes in the Classic Snapping Environment? You can’t leave them all checked on all the time, or the cursor movement lags. To deal with this, save snap states for different types of tasks. For example, you could save one set of snaps for all the hydro layers, and another set for roads.
- First set the desired snapping checkboxes in the Classic Snapping Environment.
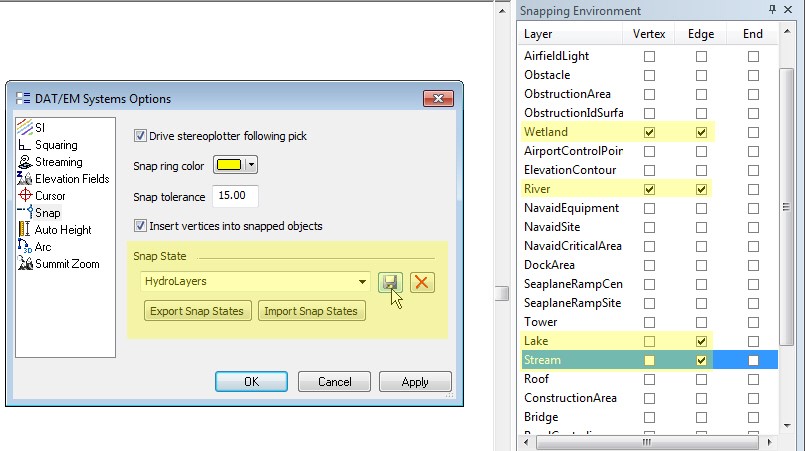
- Use the Snap State area on the Options Snap page. Enter a snap state name and save.
- Use Export and Import to share these settings with other Summit users.
- Apply the snap state again from the Options dialog or quickly set a named snap state from the DAT/EM Keypad or a “User CAD” button in Button Manager. The syntax to do that is:
LoadSnapState <snap state name>
Example shown below: LoadSnapState HydroLayers
Remember, you can use the DAT/EM Keypad on screen, even if you don’t have the keypad hardware.
Example of saving a snap state configuration
Snap off, 2D, and 3D snaps
You do not need to uncheck all the Classic Snapping checkboxes in order to turn off snapping; instead, simply turn off snapping by turning off both 2D and 3D snap on the DAT/EM toolbars:
Use Summit’s Button Manager to set a "User CAD" digitizer button to snap2d:snap3d:snapoff. Then every time you press the button, it switches to the next item: 2D snap, then 3D snap, then snap off, then back to 2D snap.
 Can You See the Difference Between 2D and 3D Snap?
Look at the snap line in stereo to easily tell whether snapping is set to 2D or 3D. When the cursor is within the snap ring tolerance of the snap-to object, a stereo snap line will draw to the snap location in (x,y,z) for a 3D snap or (x,y, stereoplotter z) for a 2D snap. With your stereo glasses on, you’ll see the difference.
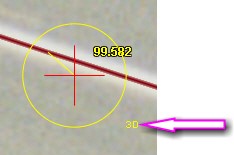
There is also a small “3D” in superimposition text outside the snap ring if 3D Snap is set. If this is missing, then the snap will be 2D:
“3D” indicates 3D Snap is set, otherwise it is 2D
Can You Use DAT/EM 2D and 3D Snap with ArcMap Drawing Tools?
DAT/EM 2D and 3D snaps – complete with their superimposition snap ring and snap lines – are designed to work with DAT/EM Capture drawing tools only.

2D and 3D Snap work with DAT/EM Capture drawing tools
If you use a native ArcMap drawing tool, such as the Line or Rectangle default construction tools, Classic Snapping will work in its default mode. That is, it will be 2D only and the snap line and snap ring will not appear in Summit’s superimposition.
Tips to Deal with Slow Snapping
Snapping in ArcMap has the potential to cause lagging in ArcMap’s cursor movement, especially if layers that are on for snapping contain lines or polygons that each have thousands of vertices. The cursor does not need to be near the many-vertex objects in order for them to cause the cursor to lag. This is due to the type of snapping algorithm used by ArcMap. It is busy checking and reporting the current cursor position against all locations on distant objects, just because they’re on the snap layer. It does not filter its checks by proximity.
It can lag enough to make it miss the snap location you’re attempting to pick.
Tips to deal with slow snapping:
- In the Classic Snapping Environment, only check on those layers that you really need to snap to right now. If snapping to a certain layer is unnecessary, uncheck it.
- Use "snapoff" while panning around and then turn on 2D or 3D snap only when you are ready to digitize with a snap. Use the snap2d:snap3d:snapoff button mentioned above.
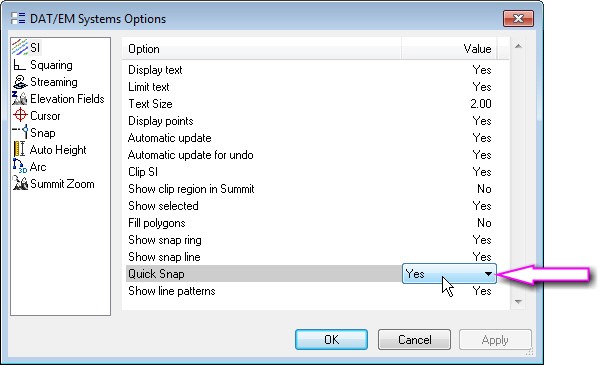
- There is a "Quick Snap" setting in the ArcMap-side DAT/EM Systems Options > SI settings page. It filters out some of the many potential snaps. Leave it off at first to see if snapping is fast enough for your project. Then if snapping is too slow, try it set to Yes and see if it helps:
Quick Snap filters snaps to make snapping faster
Whether Quick Snap should be on or off may depend on the project. You may need to review the setting when you change projects.
-End-


Comments are closed.